
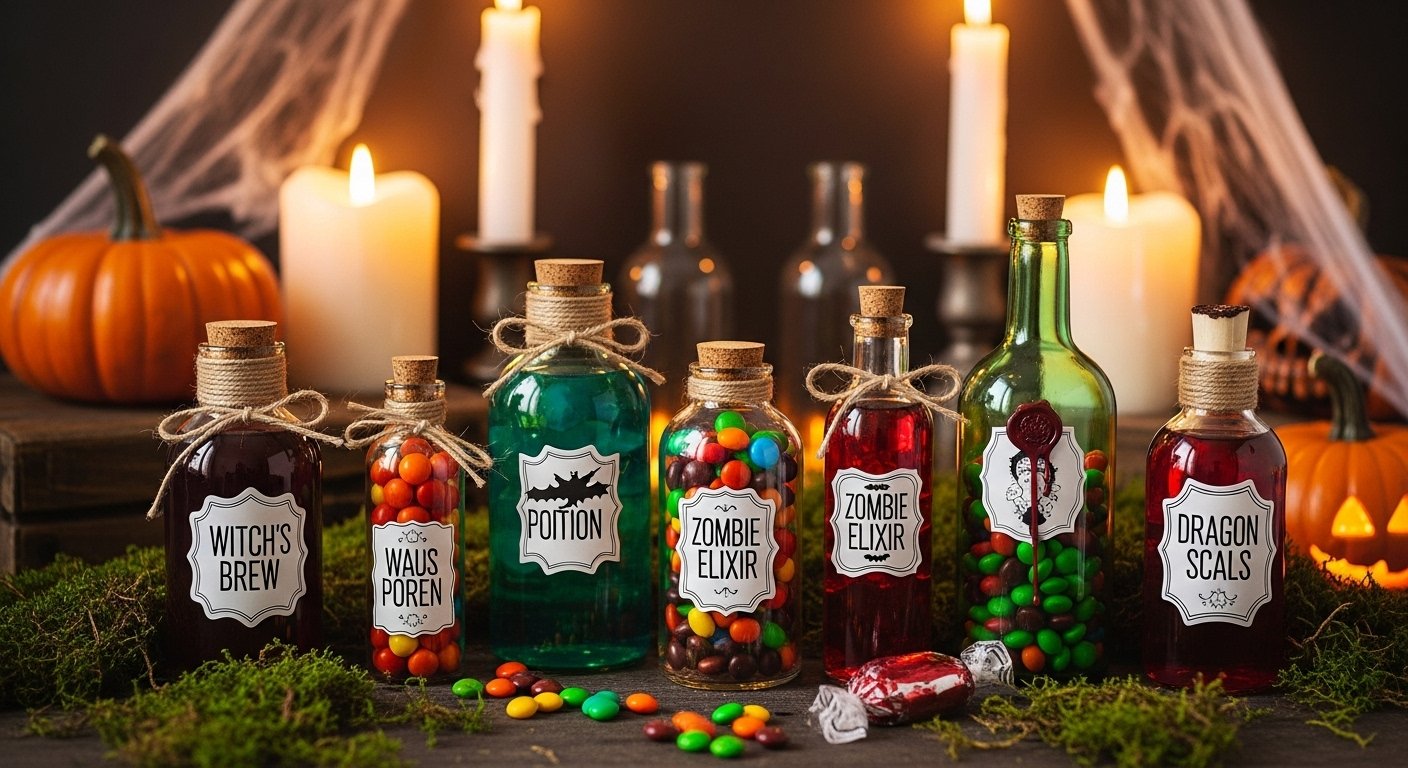
If you’ve ever wanted your Halloween party to look like something straight out of a witch’s lair or a mad scientist’s lab, potion bottles are your new best friend. These eerie, decorative bottles instantly turn ordinary drinks and snacks into spooky “elixirs” and “poisons.”
The best part? You don’t have to spend a fortune buying them. With a few simple materials (and the free printable templates included below), you can transform recycled bottles and jars into creepy-cool potion containers that’ll wow your guests this Halloween 2025.
Let’s get brewing! 🧪
🧙♀️ Why DIY Potion Bottles Are the Perfect Halloween Touch
Potion bottles do more than just look spooky — they bring your Halloween theme to life. Whether you’re hosting a haunted house, a witch’s tea party, or a kid-friendly trick-or-treat station, these bottles can serve multiple purposes:
- Drink Decor: Label your drinks with eerie names like “Witch’s Brew,” “Zombie Tonic,” or “Goblin Juice.”
- Snack Holders: Fill jars with candy “Eyeballs” (gumballs), “Worms” (gummy candies), or “Dragon Scales” (colored chips).
- Table Centerpieces: Cluster bottles with candles, moss, and cobwebs for an authentic haunted look.
- DIY Party Favors: Let guests take home their own “mini potions.”
They’re cheap, customizable, and fun to make — perfect for both adults and kids.
🧴 What You’ll Need
Before we jump into crafting, gather these basic supplies:
Materials:
- Empty glass bottles or jars (recycled soda, juice, or spice bottles)
- Printable potion labels (download your free templates below!)
- Scissors
- Glue stick or Mod Podge
- Tea or coffee (for aging paper, optional)
- Black or brown twine/ribbon
- Food coloring (for drinks)
- Optional decorations: moss, mini skulls, wax seals, fake spiders
Tools:
- Printer
- Paintbrush (if using Mod Podge)
- Funnel (for filling bottles)
💡 Pro Tip: If you’re short on bottles, check thrift stores or dollar shops — they often have tons of fun-shaped glass containers perfect for this craft.
🧃 Step-by-Step: How to Make DIY Potion Bottles
Step 1: Choose and Clean Your Bottles
Remove any labels and sticky residue. Wash and dry your bottles thoroughly. You can use warm water with baking soda or rubbing alcohol to get off stubborn glue.
Step 2: Print & Cut the Potion Labels
Download and print your free potion label templates (make sure they fit your bottle sizes). Cut them neatly with scissors.
If you want that old, spooky parchment look:
- Dip the paper in brewed tea or coffee for 2–3 minutes.
- Let it dry completely before applying.
Step 3: Apply the Labels
Use glue or Mod Podge to stick the labels onto your bottles. For extra realism, brush a thin layer of Mod Podge over the top of the label to “seal” it.
Step 4: Fill the Bottles
Now comes the fun part! Depending on your theme, you can fill the bottles with spooky drinks or snacks.
For Drinks:
- Witch’s Brew: Green punch with lime sherbet and lemon-lime soda.
- Vampire Blood: Cranberry juice mixed with a little grenadine.
- Zombie Tonic: Lemonade with a drop of blue food coloring.
For Snacks:
- Spider Eggs: White chocolate balls or malted milk candies.
- Dragon Scales: Multicolored chips or M&Ms.
- Worms in Slime: Gummy worms in green Jell-O.
Step 5: Add the Finishing Touches
Tie black or brown twine around the bottle necks. Add wax drips from a candle for an “aged” look. Scatter a few fake spiders or moss around for an extra eerie vibe.
🕯️ Creative Potion Bottle Label Ideas
Need ideas for what to name your “potions”? Here are some fun and creepy options to print or handwrite:
Drink Potion Name Ideas
- “Witch’s Brew”
- “Poison Apple Cider”
- “Zombie Elixir”
- “Bat Wing Brew”
- “Goblin Juice”
- “Ghostly Fizz”
- “Bloody Mary Mix”
Snack Potion Name Ideas
- “Worms & Dirt”
- “Dragon Scales”
- “Werewolf Fur” (cotton candy)
- “Spider Eggs”
- “Eye of Newt” (grapes or gumballs)
- “Toad Slime” (green pudding cups)
You can mix and match based on your theme — whether you’re going for witchy, mad scientist, or haunted apothecary.🎨 Free Printable Potion Bottle Templates
(Insert link or section where the reader can download the free templates)
Your free download includes:
- 10 printable potion labels (small, medium, and large sizes)
- Editable PDF version (type your own potion names)
- Black-and-white version for kids to color
👉 Tip: Print them on kraft paper or sticker sheets for the best results!
👻 Potion Bottle Display Ideas
Once your bottles are ready, don’t just line them up — make them part of your spooky setup!
1. Halloween Drink Station
Set up a “Potion Bar” where guests can mix their own drinks. Add a chalkboard sign with “Pick Your Poison” at the top.
2. Snack Table Display
Group your potion jars on a tiered tray or rustic wood board. Add eerie props like dry ice (for fog effect), candles, or faux cobwebs.
3. Party Favors Table
Small potion bottles filled with candy make perfect take-home treats! Wrap them in cellophane or mini burlap bags.
4. Kids’ DIY Corner
Print blank labels and let kids create their own potion names — it’s a fun, creative activity during a Halloween party.
💀 Quick Tips for the Perfect Potion Look
- Stick to a consistent color palette: black, green, purple, orange, and silver work best.
- Vary bottle shapes and sizes for visual interest.
- Use food-safe materials if guests will actually be eating or drinking from the bottles.
- Don’t overfill — leave a little space at the top for realism and safety.
🧡 Conclusion: Bring the Magic Home This Halloween
There’s something magical about transforming everyday items into Halloween art — and potion bottles are one of the easiest (and most impressive) ways to do it. With your free printable templates, some creativity, and a few household supplies, you can brew up a spooky scene that your guests will remember long after the night ends.
So grab those bottles, start crafting, and make your Halloween 2025 celebrations truly spellbinding! 🪄
❓FAQ: DIY Potion Bottles for Drinks & Snacks
1. Can I use plastic bottles instead of glass?
Yes! Plastic bottles work great, especially for kids’ parties. Just be sure they’re food-safe and clean.
2. What kind of printer do I need for the labels?
A regular inkjet or laser printer works fine. For best results, print on matte sticker paper.
3. Are these bottles food-safe?
If you plan to drink from them, make sure the bottles are thoroughly cleaned and used only with food-safe materials.
4. Can I reuse the bottles after Halloween?
Absolutely! Just remove the labels and wash them well. You can reuse them for Christmas decor, bath salts, or DIY gifts.
5. How can I make my bottles glow or fog up?
Add small LED tea lights behind them or use a bit of dry ice in nearby water for a foggy, mystical effect.